| Yet another tutorial for
you little scamps. This time I'm going to try and sprite a
character from a photograph I randomly picked off the internet.
This is kind of an addition to the lessons learned in my other
character art tutorial which you
might want to read first if you never have before. So let's
go. |
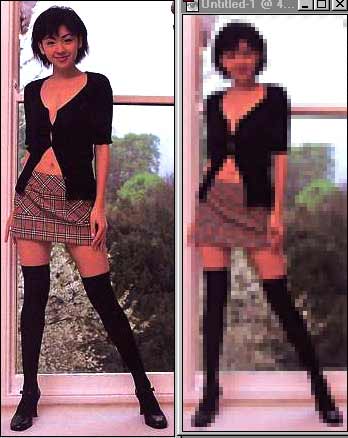
| We shall choose an image
first. I wanted an image of a person from head to toe, it
wasn't that easy to find so I just went with the first I found,
which is this girl here: |
 hey cutey
 |
| So I took this image and
cropped it and then brightened it up a bit just so I could
really see it. Now, just like in the last tutorial I'm gonna
draw a quick backround with a door and copy and paste this
image into it on a new layer. Then resize it till it looks
good next to the door [remember to hold shift!]. |
 original and resized
|
| Now that it's resized
to the right height, I crop the image again getting rid of
the backround I just hastily drew and leaving me with the
pixelated woman. As shown in the image above I place both
the original and the resized pic next to each other when I
sprite just so I can see the details that get lost in the
resize. |
| Now it's time to trace.
Using the pencil tool and the colour red I traced the contours
of the image as best as I could. And this is what I got. |
|
|
| The left leg looks a little
odd and there are a few other pixel problems with it so I'm
gonna go ahead and touch them up first. |
|
|
| There, I fixed it a little
but I feel I'll have to go back and do a lot more touch up
on the outlines while colouring it. Speaking of colour, that's
the next step, I'm going to now colour the outline with a
dark shade of what I want the insides to look like: |
|
|
| Like that. See what I
ment now? Now, on a new layer I'm going to draw the actual
colour behind the outline. I think I also touched up the outline
a bit more when I was colouring it, and I forgot to erase
the top of her head. |
|
|
| Okey doke, all filled
in. So now we have the outline and the base colours, it's
time to shade the wench! |
| I make a new adjustment
layer of brightness/contrast and set it to like -40 brightness
and +15 contrast or something, I don't remember, it's really
up to you. Then I flood fill the adjustment layer with black
and start to fill in with white the darkest shades. |
|
|
| using the original as
a guide I shaded her as best I could. Adding the fold in her
skirt and a small cleavage line on her top. There really isn't
much to this image because of all the dark black she wears,
but I shall continue anyway. |
| Now with a grey tone I'm
going to add the second level of shadow to her. |
|
|
| I added a face and tried
as best as I could to fix her clothing along with a shine
in her hair. Her face doesn't reflect the original images'
face but I think that's ok. |
| So that's it really...
There isn't much else to this besides what you've already
learned in the other
character art tutorial. So then what is the point of this
tut? |
| Well, many people said
that my other
tutorial was all well and good, but if you can't draw
in the first place [which is impossible everyone can draw
just fine!] than what are you supposed to do? So here is an
alternative. Either find a bunch of pictures off the internet
and just trace them, or get a camera and have your friends
pose for you, and if you have no friends then pose for yourself.
It's just that simple. So go forth, and make the games, because
they are easier than you think! |
 and there she is, at an
awkward 41x104 pixel height and at 18 colours not including
the backround.
and there she is, at an
awkward 41x104 pixel height and at 18 colours not including
the backround. |
|
I hope this helped, please,
comments and criticism are very much welcome, so please
email me if
you have anything to say.
eric
|
|
|